And now for something completely different. Let’s talk about boob cupcakes (I really don’t know how else to start this posted except to dive right in).
How, you ask, is this relevant to a family-related blog. What do boobs have to do with family…well quite a lot actually…but I digress.
A month ago, I decided to make some special cupcakes for a girls get-together. I thought it would be easy. A quick google for the recipe and presto. Unfortunately, that wasn’t the case.
A lot of research online got me nowhere fast, so I whipped some great looking boobies together all by myself, using the advice I’d collected from the 4-corners of cyberspace.
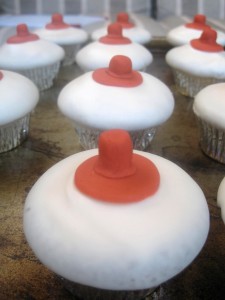
So sit back and relax (your prayers have been answered), here are step-by-step instructions for some swell boobie cupcakes. They’re sure to be a hit at your next girls get-together, baby shower or even a breast cancer fundraiser. Now go forth and bake.
BTW…these were the easiest cupcakes I’ve ever made. You know how you give yourself a certain timeframe to bake and then find it takes you 4 times what you estimated…NOT THESE BABIES! That was a first for me. It actually took me a third of the time I estimated…a modern day miracle.
Dark Chocolate Cupcakes
Ingredients:
2 cups granulated sugar
1 3/4 cups flour
3/4 cups cocoa
2 tsp baking soda
1 tsp baking powder
1/2 tsp salt
2 eggs
1 cup buttermilk or sourmilk
1 cup strong back coffee
1/2 cup vegetable oil
1 tsp vanilla
Directions:
- Preheat oven to 350 Degrees F
- Combine the first 6 ingredients in a large bowl.
- Add the remaining ingredients to the bowl and beat with hand mixer on medium speed for 2 minutes (batter will be thin).
- Pour batter into a muffin tin lined with paper sleeves. Fill almost to he top ( I left 1/8th of an inch at the top of the paper)
- Bake for 15-20 minutes and test with toothpick inserted into the center. When removed, the toothpick should be clean with no batter sticking to it.
- Transfer to cooling rack and cool completely before icing.
Decorating:
These cupcakes are dipped in warm icing which gives them a smooth, glossy sheen. It also allows you to ice about 24 cupcakes perfectly in roughly 10 minutes…which is SWEET!!!! (pun intended)
Ingredients:
1 large or 2 small containers of white store-bought icing (Betty Crocker or Duncan Hines)
Food colouring (gel works best) red, yellow, brown
Wilton pre-made fondant
Icing the cupcakes:
- Refridgerate cupcakes for 30 minutes prior to icing, this helps the cupcake stay together while dipping.
- Transfer icing into a small, deep bowl and tint with food colouring to achieve your desired skin tone.
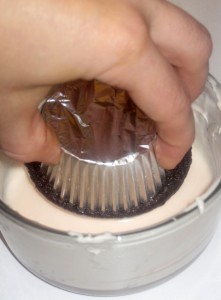
- Microwave the tinted icing at 10 second intervals, stirring between each interval until the icing has the consistency of Elmers glue.
- Dip cupcakes in warm icing up to the paper, let excess drip off, and set back on tray.
- Let icing firm up.
Note: DO NOT overheat the icing or it will separate and you’ll need to head back to the store for more icing. If the icing is too thick it will pull on the cupcake and not give you a thin, smooth glaze. You may need to re-heat the icing halfway through the process to keep the perfect consistency. It sounds tricky but it’s not, just give it a try.
Creating the Nipple:
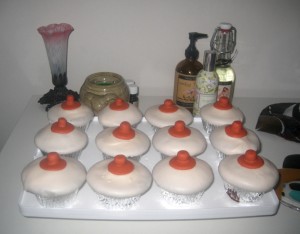 I laughed my way through this whole process. Initially, I made a demo out of bubble gum. Effective but sticky. In a pinch, I think the Bubble Yum would work but it may get mushy and bleed into the icing. If you ever try it, let me know the results. I opted to use fondant.
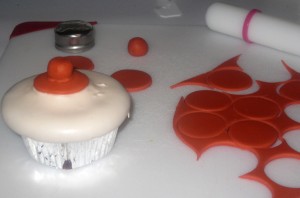
I’d never worked with fondant before and it was dead easy. A girlfriend ( thanks Bethie) gave me her fondant rolling pin and some white, pre-made fondant (a little goes a long way). The most tedious part was kneading the colour into the fondant for the nipple colour. It took a forever because I was uber cautious…a drop of this a drop of that. I should have been more agressive with the colour. Eventually, I ended up with an odd brick colour (perfectionism is overrated). The metal lid from a salt shaker became my cookie cutter, which worked perfectly. I cut out small circles, then rolled a piece of fondant into a snake, cut 1/2 inch pieces, flattened the ends and attached one to each circle (nipple style). I suggest using a tiny bit of water and some pressure to attach the mounts to the circles (ok…that sentence makes me laugh). Finally the tray of completed nipples (that visual makes me laugh too…sorry, no pictures) were gently placed on the iced cupcakes and pressed into place…VIOLA!
BTW…Transportation was brutal . Perhaps if you left them out over night the icing would firm up more. Even with a few dings, they were still a big hit and super easy to make (all things considered).

