May 092010
 

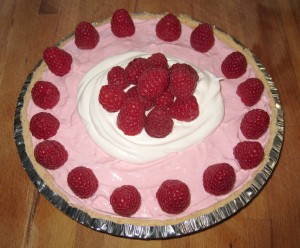
Today, I made this recipe…again. It was a special request from my Mom (Happy Mother’s Day!), so how could I say no. Especially considering you only need 10 minutes and 3 ingredients (all of which I keep on hand in the cupboard for dessert emergencies).

I think my Mom likes this dessert because the light version tastes as good as the regular version. If you are calorie conscious use Light Jello and Light Cool Whip (I don’t recommend using the No Fat version as it effects the density of the pie). If you want to make  “your masterpiece” look fancier, I’d suggest moving the bought pie crust into one of your own pie plates before you start (why not?) and adding some  Cool Whip and fresh berries to the top of the plated slice of pie…tah DAH!

Pay attention when the recipe says to let the mixture cool in the fridge before piling it into the pie crust. If you forget about bowl of filling, you will be serving the pie out of the bowl (it sets pretty firmly). If you are the kind of person that burns things under “speed broil”, I’m talking to you…you know who you are…enough said.

Cool ‘N Easy Pie Recipe

Ingredients
2/3 cup boiling water
1 pkg. JELL-O Brand Strawberry Flavor Gelatin (4-serving size)
Ice cubes
1/2 cup cold water
1 tub (8oz) Cool Whip Topping, thawed
1 store bought pie crust (60z)

Directions

In a large bowl, stir boiling water into dry gelatin mix for 2 minutes until completely dissolved

Add enough ice to cold water to measure 1 cup. Add to gelatin; stir until slightly thickened. Remove any unmelted ice.

Add whipped topping; stir with wire whisk until well blended

Refrigerate 15 to 20 minutes or until mixture is thick enough to mound

Spoon into crust

Refrigerate at least 4 hours until firm. Store leftovers in the fridge.

Note: I’ve used Strawberry and Raspberry Jello but I guess you could use any flavor.

Recipe courtesy of Kraft Foods

Apr 302010
 

What was I thinking?

Ok, I’ll come clean. I actually remember what I was thinking. It went something like this, “Crap, Valentine’s Day is tomorrow” and “Double crap, he’s expecting me to bake him something like previous years”. I dug deep and decided to make pink, heart-shaped rice krispie treats with words on them (aka those candy hearts). My husband loves rice krispie squares and I can make them in a heartbeat so I decided that would be perfect.

I applied the tiniest amount of red food colouring to the melted marshmallow mixture and created a ghastly Pepto-bismol pink. Yikes!  After studying the colour, and convincing myself that it wasn’t so bad, I decided to proceed. I pressed the mixture into a greased cookie sheet and punched out hearts using a large, heart-shaped cookie cutter. Then, I cut the left over bits into diamonds and “iced” them.

They still looked gross. I melted “Wilton red candy melts” (that’s what they’re called) and piped words on the hearts which improved the look . Unfortunately, they were still unappetizing. I know this for a fact as I took some to work and they lasted until the afternoon. A very bad sign.

That day I learned a valuable lesson (besides don’t leave things to the last minute) that I can now put in to practice with my own family. Original, unadulterated Rice Krispie Squares are best…period. There are some things in this world that you just can’t improve upon. This  is one of them.

Original Rice Krispie Squares

Ingredients
1/4 cup margarine or butter
1 pkg (about 40) regular marshmallows or 5 cups miniature  (250 g)
1/2 tsp vanilla extract (optional)
6 cups RICE KRISPIES cereal

Directions

  1. Melt margarine in large saucepan over low heat. Add marshmallows and stir until completely melted. Remove from heat.
  2. Stir in vanilla. Stir in RICE KRISPIES cereal until well coated. Using lightly buttered spatula, press into buttered 3.5 L (13 x 9″) pan.
  3. Allow mixture to cool. Cut into bars. Best if served same day.
     
    Note:
    For chewier bars, use an extra cup of miniature marshmallows or about 8 regular marshmallows.

Courtesy of Kellogg‘s Rice Krispies.ca

Apr 282010
 

If you don’t like coconut you can stop reading right now. If you like coconut, brace yourself.

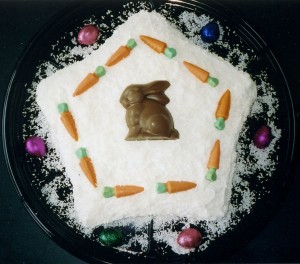
Simple ingredients (almost idiot-proof, I’d say): cake mix, cool whip, coconut are combined to produce an AWESOME tasting, melt -in-your-mouth cake. This one is so good, I take it to potlucks in a star pan. The cake, shown above, was my contribution to an Easter brunch a couple of years ago. I bought the chocolate decoration at Charlie’s Chocolate factory in Burnaby.

Let me know if you make it. I hope you like it.

Coconut Cream Cake

Ingredients
1 yellow cake mix
1 1/2 cups milk
1/2 cup sugar
2 cups flaked coconut
1 container of Cool Whip (4cups or 1 L)

Directions

  1. Prepare cake as directed and bake in a 9″ x 13″ pan.
  2. Cool 15 minutes and prick holes all over cake
  3. Combine milk, sugar, and 1/2 cup of coconut in a saucepan. Bring to a boil and simmer for 1 minute
  4. Carefully spoon over warm cake and cool completely
  5. Fold 1/2 cup of coconut into Cool Whip and spread over cake
  6. Sprinkle remaining coconut on top
  7. Refridgerate overnight

Courtesy of  Winners More Recipes from the Best of Bridge, page 191